Physical Address
304 North Cardinal St.
Dorchester Center, MA 02124
Physical Address
304 North Cardinal St.
Dorchester Center, MA 02124
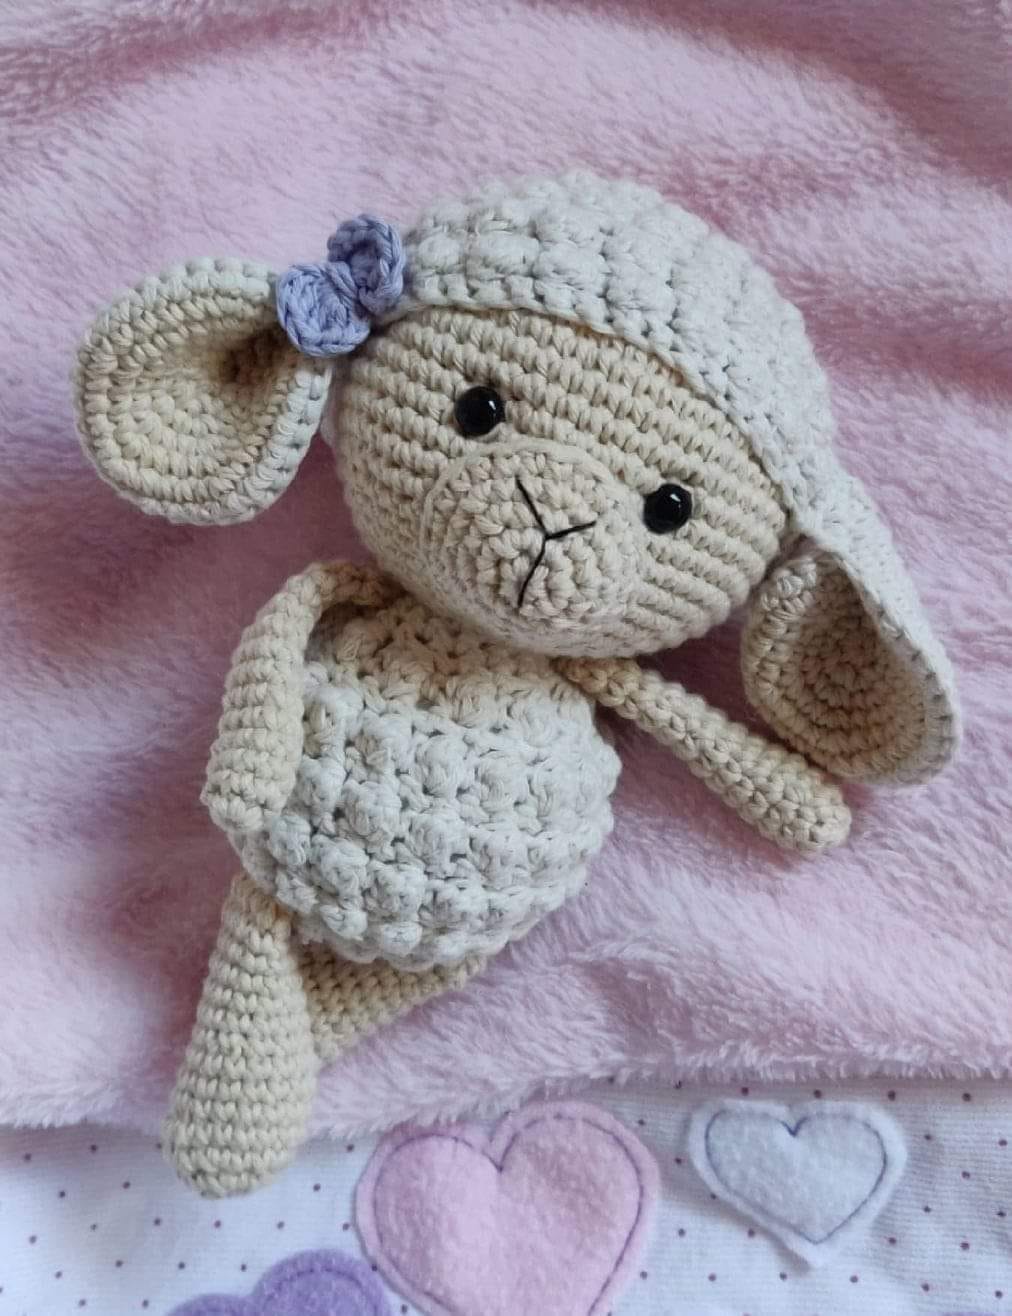
Handcrafted with Love
Handcrafted with Love
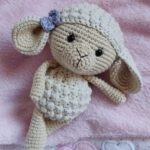
Para tejer esta ovejita vamos a necesitar:
• Hilo de algodón 8/6
(Yo usé la marca Sole de LHO, el 37 y el 814).
• Aguja 2,5 (podés usar 2,75 o 3).
• Vellón siliconado.
• Ojitos de seguridad nro 8.
• Aguja lanera.
Vuelta 1: anillo mágico de 6 mp.
Vuelta 2: 1 aum en cada punto.
Vuelta 3: 1 mp / 1 aum (18)
Vuelta 4: 2 mp / 1 aum (24)
Vuelta 5: 3 mp / 1 aum (30)
Vuelta 6: 4 mp / 1 aum (36)
Vuelta 7: 5 mp / 1 aum (42)
Vuelta 8: 6 mp / 1 aum (48)
Vuelta 9: 7 mp / 1 aum (54)
Vuelta 10: 8 mp / 1 aum (60)
Vuelta 11 a 19: 1 mp en cada punto (60)
Vuelta 20: 8 mp / 1 dis (54)
Vuelta 21: 7 mp / 1 dis (48)
Vuelta 22: 6 mp / 1 dis (42)
Vuelta 23: 5 mp / 1 dis (36)
Vuelta 24: 4 mp / 1 dis (30)
Vuelta 25: 3 mp / 1 dis (24)
Vuelta 26: 2 mp / 1 dis (18)
Vuelta 27: 1 mp / 1 dis (12)
Para terminar yo no hago 6 dis, hago 1 o 2 y luego ya cierro con aguja lanera, para que no quede tanto rejunte de hilo.
Escondés hebra y vamos al gorrito.
Vuelta 1: anillo mágico de 6 mp.
Vuelta 2: 1 mp / 1 aum (9)
Vuelta 3 a 14: 1 mp en cada punto (9)
Yo cierro ambos extremos con mp.
Dejá hebra larga para coser.
Vuelta 1: anillo mágico de 6 mp.
Vuelta 2: 1 aum en cada punto (12)
Vuelta 3: 1 mp / 1 aum (18)
Vuelta 4 a 7: 1 mp en cada punto (18)
Vuelta 5: 1 mp / 1 dis (12)
Vuelta 6 a 11: 1 mp en cada punto (12)
Cierro igual que los bracitos.
Vas a tejer 4 idénticas:
2 en color beige que son la parte interna (tejé primero estas y cortá el hilo cuando termines), y 2 en color crudo que son la parte externa.
Cuando termines estas NO cortes el hilo y unís una parte externa y una interna (una crudita que queda por fuera y una beige que queda por dentro) con toda una vuelta de medios puntos.
Fijate que el lado derecho de cada una te quede hacia afuera.
Luego con unas puntaditas (yo hago 3 o 4 medios puntos) le das la forma de gota que tiene la oreja.
Dejás hebra larga y cortás.
Después las vamos a coser a la cabeza.
Vuelta 1: anillo mágico de 6 mp.
Vuelta 2: 1 aum en cada punto (12)
Vuelta 3: 1 mp / 1 aum (18)
Vuelta 4: 2 mp / 1 aum (24)
Vuelta 5: 3 mp / 1 aum (30)
Vuelta 6: 4 mp / 1 aum (36)
Vuelta 7: 1 mp en cada punto (36)
Es importante que tengas en cuenta que todas tejemos diferente, tanto en materiales, agujas, tensión del hilo, etc.
Entonces cuando hay una cabeza y un gorro, y más aún que son con puntos diferentes ambas, vayas probando antes de seguir tejiendo y ajustando a la cabeza que hayas tejido.
Vamos a una parte más compleja pero cuando le agarrás la mano no parás.
Yo lo hago con punto bobble o piña, que es un punto de la familia de los puntos agrupados (como el popcorn por ejemplo), y lo hago de 3 varetas para esta ovejita.
Me parece que por el tamaño hacerlo de 4 o 5 varetas (que es lo más común y el que uso para mis ovejas más grandes) queda como mucho, pero podés hacerlo tranquilamente.
Te explico brevemente cómo es este punto:
Para el gorrito vas a tejer una hilera con puntos Bobble y medios puntos, y una hilera de solo medios puntos. Va alternando.
Vuelta 1: anillo mágico de 6 mp.
ATENCIÓN AHORA!
Vuelta 2: vas a hacer un Bobble en el 1er punto de ese anillo, y EN EL MISMO PUNTO, 1 mp.
Entonces te queda 1 Bobble y 1 mp en el mismo punto.
Vas a terminar con 12 mp.
Esta vuelta queda muy apretada, ojo con saltarte puntos.
Vuelta 3: 1 aum de mp en cada punto (24)
Vuelta 4: 1 Bobble / 1 mp en el siguiente
(Te quedan al terminar 24 mp en total y 12 pancitas)
Vuelta 5: 1 mp / 1 aum (36)
Vuelta 6: 1 Bobble / 1 mp
(Te quedan 36 mp en total y 18 pancitas)
Vuelta 7: 2 mp / 1 aum (48)
Vuelta 8: 1 Bobble / 1 mp
(Te quedan 48 mp en total y 24 pancitas)
Vuelta 9: 1 mp en cada punto (48)
Vuelta 10: 1 Bobble / 1 mp
(48 mp y 24 pancitas)
Vuelta 11: 1 mp en cada punto (48)
Vuelta 12: 1 Bobble / 1 mp
(48 mp y 24 pancitas)
Vuelta 13: 1 mp en cada punto (48)
Vuelta 14: probá el gorrito antes de seguir para ajustarlo a la cabeza que hayas tejido.
A veces el grosor del hilo o depende cómo tejas modifica los tamaños.
Si querés esta vuelta podés repetir 1 Bobble y 1 mp, probá y vas ajustando.
Tejas las hileras que tejas, terminá con una vuelta de mp.
Misma técnica que el gorrito.
Vuelta 1: anillo mágico de 6 mp.
Vuelta 2: 1 Bobble y 1 mp en el mismo punto
(terminás con 12 mp en total y 6 pancitas)
Vuelta 3: 1 aum en cada punto (24)
Vuelta 4: 1 Bobble / 1 mp en el siguiente
(24 mp y 12 pancitas)
Vuelta 5: 1 mp / 1 aum (36)
Vuelta 6: 1 Bobble / 1 mp
(36 mp y 18 pancitas)
Vuelta 7: 1 mp en cada punto (36)
Vuelta 8: 1 Bobble / 1 mp
(36 mp y 18 pancitas)
Vuelta 9: 1 mp en cada punto (36)
Vuelta 10: 1 Bobble / 1 mp
(36 mp y 18 pancitas)
Vuelta 11: 1 mp en cada punto (36)
Vuelta 12: 1 Bobble / 1 mp
(36 mp y 18 pancitas)
Vuelta 13: 1 mp / 1 dis (24)
Vuelta 14: 1 Bobble / 1 mp
(24 mp y 12 pancitas)
Vuelta 15: 1 mp en cada punto (24)
Dejás hebra larga para coser.
Los ojitos los pongo entre la hilera 16 y 17 con 7 puntos de distancia.
Eso fijate a vos cómo te gustan en este muñeco, a mí en general me gustan cerca del hocico.
Vuelta 1: anillo mágico de 6 mp.
Vuelta 2: 1 aum en cada punto (12)
Vuelta 3: 1 mp / 1 aum (18)
Vuelta 4: 2 mp / 1 aum (24)
Vuelta 5: 1 mp en cada punto (24)
Cosés el gorrito, las orejas y el hocico a la cabeza.
Bordá la naricita.
Cosés el cuerpo a la cabeza, los brazos y las piernas.
Podés agregarle moñito, florcita, lo que quieras.
ESPERO QUE DISFRUTES DE TEJERLA TANTO COMO YO!
Gracias!
Gaby, de Pájaro Tejidos.
To crochet this little sheep you will need:
• 8/6 cotton yarn
(I used the brand Sole de LHO, colors 37 and 814)
• 2.5 mm crochet hook
(you can also use 2.75 mm or 3 mm)
• Polyester fiberfill
• 8 mm safety eyes
• Yarn needle
Round 1: 6 sc in a magic ring.
Round 2: inc in each stitch. (12)
Round 3: 1 sc, 1 inc repeat around. (18)
Round 4: 2 sc, 1 inc repeat around. (24)
Round 5: 3 sc, 1 inc repeat around. (30)
Round 6: 4 sc, 1 inc repeat around. (36)
Round 7: 5 sc, 1 inc repeat around. (42)
Round 8: 6 sc, 1 inc repeat around. (48)
Round 9: 7 sc, 1 inc repeat around. (54)
Round 10: 8 sc, 1 inc repeat around. (60)
Rounds 11–19: 1 sc in each stitch. (60)
Round 20: 8 sc, 1 dec repeat around. (54)
Round 21: 7 sc, 1 dec repeat around. (48)
Round 22: 6 sc, 1 dec repeat around. (42)
Round 23: 5 sc, 1 dec repeat around. (36)
Round 24: 4 sc, 1 dec repeat around. (30)
Round 25: 3 sc, 1 dec repeat around. (24)
Round 26: 2 sc, 1 dec repeat around. (18)
Round 27: 1 sc, 1 dec repeat around. (12)
To finish, I don’t make 6 decreases. I only make 1 or 2 decreases and then close with a yarn needle so the top doesn’t become too bulky.
Hide the yarn tail and move on to the hat.
Round 1: 6 sc in a magic ring.
Round 2: 1 sc, 1 inc repeat around. (9)
Rounds 3–14: 1 sc in each stitch. (9)
I close both ends with single crochet stitches.
Leave a long yarn tail for sewing.
Round 1: 6 sc in a magic ring.
Round 2: inc in each stitch. (12)
Round 3: 1 sc, 1 inc repeat around. (18)
Rounds 4–7: 1 sc in each stitch. (18)
Round 8: 1 sc, 1 dec repeat around. (12)
Rounds 9–14: 1 sc in each stitch. (12)
Close the same way as the arms.
You will crochet 4 identical pieces:
2 in beige for the inner part
(I crochet these first and cut the yarn when finished)
2 in cream/off-white for the outer part
(when you finish these, DO NOT cut the yarn)
Then place one outer piece together with one inner piece.
(The cream piece stays on the outside and the beige piece on the inside.)
Crochet all around both pieces together with single crochet stitches.
Make sure the right side of each piece faces outward.
Then, using a few stitches
(I make 3 or 4 single crochet stitches), shape the ear into a teardrop form.
Leave a long yarn tail and cut the yarn.
Later we will sew them onto the head.
Round 1: 6 sc in a magic ring.
Round 2: inc in each stitch. (12)
Round 3: 1 sc, 1 inc repeat around. (18)
Round 4: 2 sc, 1 inc repeat around. (24)
Round 5: 3 sc, 1 inc repeat around. (30)
Round 6: 4 sc, 1 inc repeat around. (36)
Round 7: 1 sc in each stitch. (36)
It’s important to remember that everyone crochets differently — materials, hook size, yarn tension, etc.
Since the head and the hat use different stitches, keep trying the hat on the head as you go and adjust it if necessary.
We are moving on to a more complex part, but once you get the hang of it, you won’t want to stop.
I use the bobble stitch (also called puff/pine stitch). It belongs to the family of clustered stitches, like popcorn stitch for example.
For this little sheep, I make the bobbles with 3 double crochets.
I think making them with 4 or 5 double crochets (which is more common and what I use for bigger sheep) would look too bulky for this size, but you can absolutely do it if you want.
For the hat, you will alternate:
• one round with bobble stitches and single crochets
• one round with only single crochets
Round 1: 6 sc in a magic ring.
IMPORTANT!
Round 2: Make 1 bobble stitch in the first stitch of the ring and, IN THE SAME STITCH, make 1 sc.
So you will have 1 bobble and 1 sc in the same stitch.
You will finish with 12 sc total.
This round becomes very tight, so be careful not to skip stitches.
Round 3: inc in each stitch. (24)
Round 4: 1 bobble, 1 sc in the next stitch
(24 total stitches and 12 bobbles)
Round 5: 1 sc, 1 inc repeat around. (36)
Round 6: 1 bobble, 1 sc repeat around
(36 total stitches and 18 bobbles)
Round 7: 2 sc, 1 inc repeat around. (48)
Round 8: 1 bobble, 1 sc repeat around
(48 total stitches and 24 bobbles)
Round 9: 1 sc in each stitch. (48)
Round 10: 1 bobble, 1 sc repeat around
(48 stitches and 24 bobbles)
Round 11: 1 sc in each stitch. (48)
Round 12: 1 bobble, 1 sc repeat around
(48 stitches and 24 bobbles)
Round 13: 1 sc in each stitch. (48)
Round 14: Try the hat on before continuing so you can adjust it to the head size.
Yarn thickness and crochet tension can change the sizing.
If you want, you can repeat another round of:
1 bobble, 1 sc
Keep trying it on and adjusting as needed.
No matter how many rounds you make, always finish with one round of single crochet stitches.
Same technique as the hat.
Round 1: 6 sc in a magic ring.
Round 2: 1 bobble and 1 sc in the same stitch
(12 total stitches and 6 bobbles)
Round 3: inc in each stitch. (24)
Round 4: 1 bobble, 1 sc in the next stitch
(24 stitches and 12 bobbles)
Round 5: 1 sc, 1 inc repeat around. (36)
Round 6: 1 bobble, 1 sc repeat around
(36 stitches and 18 bobbles)
Round 7: 1 sc in each stitch. (36)
Round 8: 1 bobble, 1 sc repeat around
(36 stitches and 18 bobbles)
Round 9: 1 sc in each stitch. (36)
Round 10: 1 bobble, 1 sc repeat around
(36 stitches and 18 bobbles)
Round 11: 1 sc in each stitch. (36)
Round 12: 1 bobble, 1 sc repeat around
(36 stitches and 18 bobbles)
Round 13: 1 sc, 1 dec repeat around. (24)
Round 14: 1 bobble, 1 sc repeat around
(24 stitches and 12 bobbles)
Round 15: 1 sc in each stitch. (24)
Leave a long yarn tail for sewing.
I place the safety eyes between rounds 16 and 17 with 7 stitches between them.
Of course, adjust them however you like best on your doll — I personally like them close to the muzzle.
Round 1: 6 sc in a magic ring.
Round 2: inc in each stitch. (12)
Round 3: 1 sc, 1 inc repeat around. (18)
Round 4: 2 sc, 1 inc repeat around. (24)
Round 5: 1 sc in each stitch. (24)
Sew the hat, ears, and muzzle onto the head.
Embroider the nose.
Sew the body to the head, then sew on the arms and legs.
You can add a bow, little flower, or any decoration you like.
I HOPE YOU ENJOY CROCHETING HER AS MUCH AS I DID!
Thank you!
Gaby from Pájaro Tejidos.